Capturing Processes with Worksoft Business Capture
After Worksoft Business Capture starts, all interactions within the application are captured. These processes can be imported into other Worksoft products for document generation, automated business process discovery, and testing acceleration.
Be careful when entering confidential information because all interactions are retained while Business Capture is in Capture mode. Remove the image from a selected step using the Shred Step Image button in the Step Details pane to reduce the chance of revealing confidential information.
To create a Capture, you must complete the following tasks:
- Access Business Capture
- Select a user interface view
- Configure your Business Capture settings
- Capture processes
Accessing Business Capture
The Business Capture icon  appears on your desktop after installation. Double-click the icon to open the tool.
Selecting a User Interface View
In Business Capture, you can select between two different views. Click on one of the following buttons:
|
Button |
View |
Description |
|
|
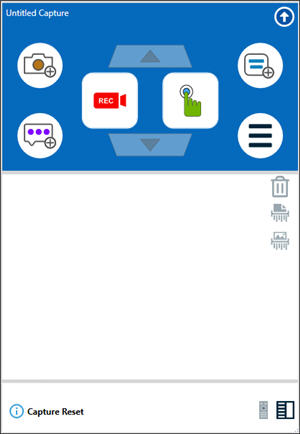
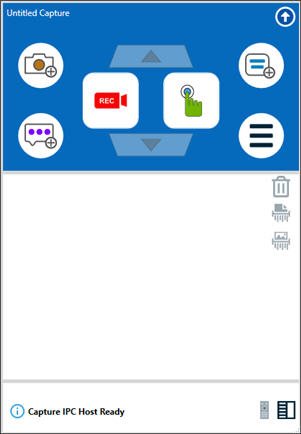
Business User Persona |
Use Business Capture to record the steps of a process. |
|
|
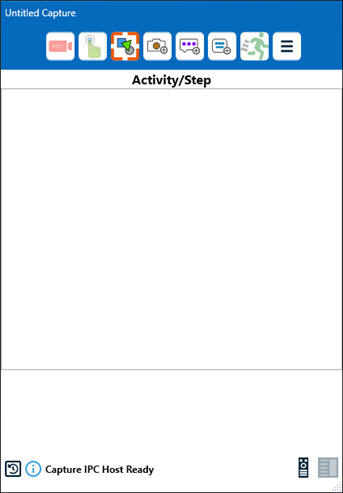
Automator User Persona |
Use Business Capture to record the steps of a process, create automation, and execute the process steps. |


When you close Business Capture, the last persona used is saved.
|
Business User Persona User Interface
|
Automator User Personal User Interface
|
Configuring Settings
Before you begin capturing your processes, you must enable the interfaces you intend to use and set your Capture settings. This procedure uses the Business User Persona view.
The Menu options are different for the two personas.
To configure settings:
-
Click the Business Capture
icon on your desktop.Worksoft Business Capture opens.
-
Click the Main Menu
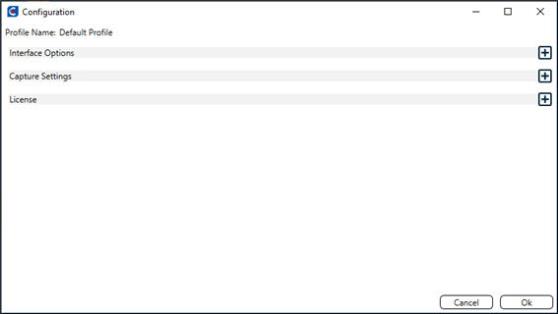
 button and select Settings > Configure Interface and License.
The Configuration dialog opens.
-
Expand the Interface Options section.
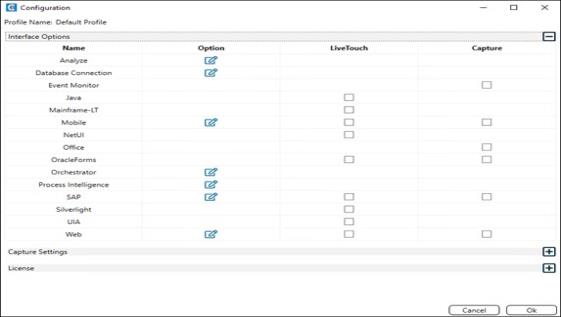
-
Select the interfaces you intend to use for Capture and LiveTouch from the Interface Options list. If you do not select at least one interface, Capture mode and LiveTouch are not enabled.
During a capture session, you can enable or disable different interfaces. If you change an interface during a session, you will not lose the previously captured steps.
- If an Edit Option
 icon appears next to an interface you intend to use, click the button to configure the interface. In the list below, click on a highlighted interface for configuration information:
- Mobile
- SAP
- If you want to save your Capture to another Worksoft product, select one of the following options and configure connection details:
- Database (Certify database)
- Process Intelligence
- Close the Interface Options section after you have completed configuring your interfaces and products.
-
Expand the Capture Settings section and configure the following options:
Option
Description
Always on Top
Select this option to keep Worksoft Capture on top of all windows on the screen.
This option is only available in the Automator User Persona.
Capture Idle Timeout Policy (hours)
Set the amount in hours before Worksoft Business Capture shuts down. When Business Capture shuts down, the license can be used by another user.
The default value is 0 which means it never times out. Select one of the following values:
- 0
- .5 (30 minutes)
- 1
- 2
- 4
- 8
- 16
- 24
The timer starts when there is no mouse movement.
This option is only available in the Automator User Persona.
Collapse Previous Named Activity
Select this option if you want to collapse the last Named Activity step automatically. If you select this option, Business Capture automatically collapses the previous Named Activity step when creating a new Named Activity step.
This option is only available in the Automator User Persona.
Disable Data Capture
Select this option to remove the data from captured steps.
Image Capture Mode
Select one of the following options from the drop-down list:
- All - Capture takes an image for each step and object. Each time a window is visited or updated, Capture takes a window image.
- None - Capture will not take window or object screen images. This option is a good choice if you have applications with sensitive information.
This option is only available in the Automator User Persona.
Image Delay Time
Enter the amount of delay in seconds when taking a screen image. The default value is .25 seconds.
LiveTouch Stop Time Policy (seconds)
Set a stop time policy for LiveTouch in seconds. When you stop LiveTouch, interfaces need time to respond and provide an update.
Default time is 30 seconds.
Show Step Preview
Select this option to preview steps.
This option is only available in the Business User Persona.
Show Step Suggestions
Select this option to show the XF Definitions and Configuration files associated with the object.
This option is only available in the Automator User Persona.
Web LiveTouch Image Padding
Enter the amount of additional pixels around the LiveTouch object screen image. The default value is 0 pixels.
This option only applies to the Web interface.
-
Click OK to close the Configuration dialog.
If you are using the Automator User Persona, you can select to automatically create a named activity when a step is captured in a new workflow.
-
Click the Main Menu
button and select Settings > Auto Named Activity Creation to enable this option.
Capturing Processes
After you have configured your settings, you are now ready to capture processes.
To capture processes with Business Capture:
-
Open the application where you want to capture the steps of the process.
-
Click the Capture
 button in Business Capture.
After you click the button, the button changes to Capture mode
 .
.If you have not selected an interface, Capture mode is not enabled.
-
Begin creating your business process workflow. As you are working, Business Capture displays the latest recorded step.
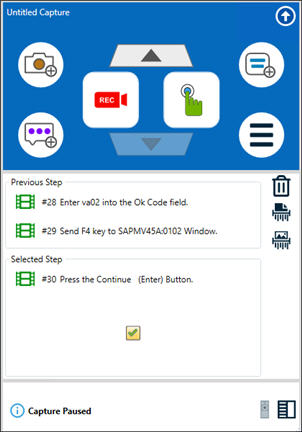
-
If you need to pause during this process, click the Capture button, and Worksoft Capture button goes into Stop Capture mode
. -
If you need to delete a step, click the Delete Step
 icon next to the step.
Note: To undo an action, press <Ctrl> <Z>. With the Undo action, you can undo deleting, renaming, and shredding data and images. In the Automator User Persona, you can also undo cut and paste actions.
-
If needed, you can use the following buttons as you create your Capture:
Button
Description
Go To


Review previous or later steps.
Shred Step Data

Delete sensitive data in a step.
Shred Step Image

Delete a screen image.
- After you complete your process, click the Capture button to end Capture mode.
- Click the Main Menu button and select one of the following:
- Save to Local File - Save Capture as an XML file.
-
Save to Process Intelligence - For more information about saving to Worksoft Process Intelligence, see Saving a Captured Process to Worksoft Process Intelligence.
The Save to File screen opens.
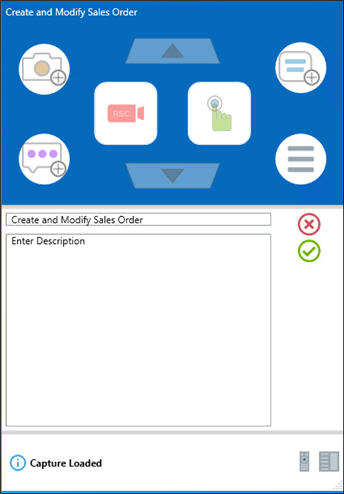
- In the Capture Name field, enter a name for your Capture file.
- (Optional) In the Description field, enter a description.
-
Click Save
 .
.The Save As dialog opens.
-
Browse to the folder in which you want to save your Capture file.
-
Click Save.
To discard a Capture:
-
If you do not want to save the Capture, click the Main Menu
button and select Start New Capture.A message opens asking if you want to clear the current Capture.
- Click the Accept button to discard the Capture.