Example: Changing Recordset Data with Certify Results API
This example shows you how to change recordset data before and after execution with Certify Results API.
Prerequisites
Generate a token in Certify Results API. For more information, see Generating a Token in Certify Results API.
API Endpoints
Swagger Example
- Open Worksoft Certify.
-
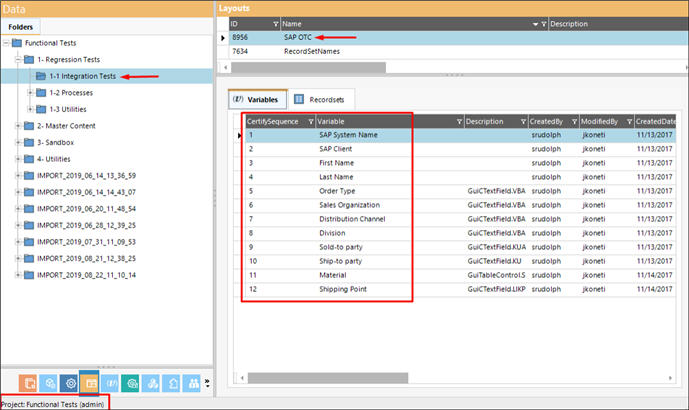
From the Navigation pane, click Data.
The Data window opens.
-
Create a layout. For more information, see Creating Layouts Using Processes and Child Processes or Creating Layouts Using Objects.
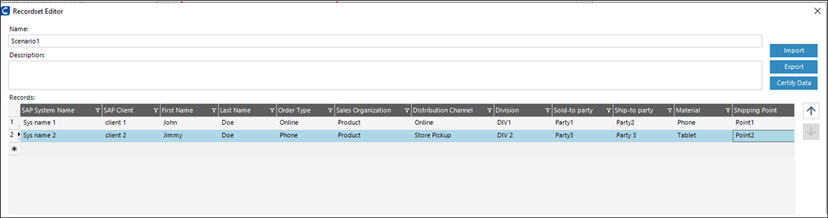
In the example below, the SAP OTC is created under project Functional Tests and in the folder 1-Regression Tests > 1-1 Integration Tests.
-
Create a recordset and add to the layout. For more information, see Creating and Editing a Recordset.
-
Save the layout.
-
Open the Certify Results API Swagger page:
http(s)://yourdomain/CertifyResultsAPI/swagger/ui/index
-
Add the API token to Swagger.

-
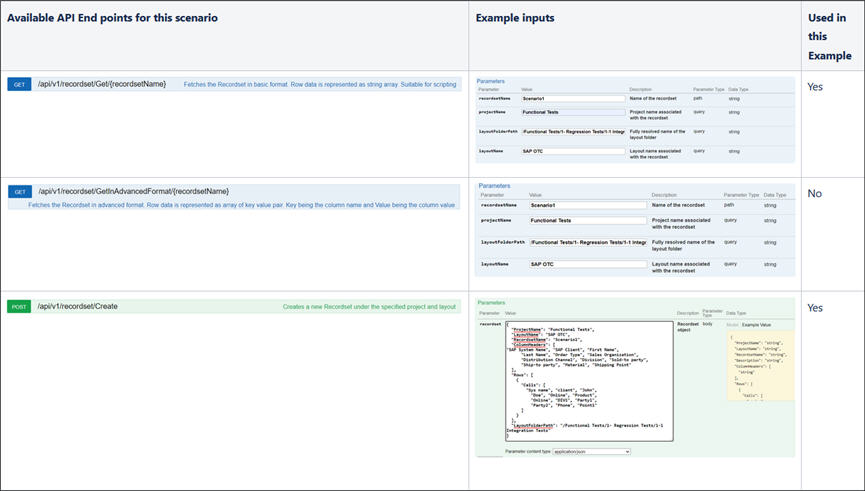
Enter the required inputs to the GET /api/v1/recordset/Get/{recordsetName} endpoint as described in the above API Endpoints section.
Example:
recordsetName: Scenario1
projectName: Function Tests
layoutFolderPath: /Functional Tests/1-RegressionTests/1-1 Integration Tests
layoutName: SAP OTC
-
Click the Try it out! button.
-
Copy the URL that was generated in the Request URL section. The URL is used to retrieve the data for Scenario1 recordset. It can be used in a Microsoft® PowerShell® script or a Linux® script.
Example:
http://certifydemo/CertifyResultsAPI/api/v1/recordset/Get/Scenario1?projectName=Functional%20Tests&layoutFolderPath=%2FFunctional%20Tests%2F1-%20Regression%20Tests%2F1-1%20Integration%20Tests&layoutName=SAP%20OTC
-
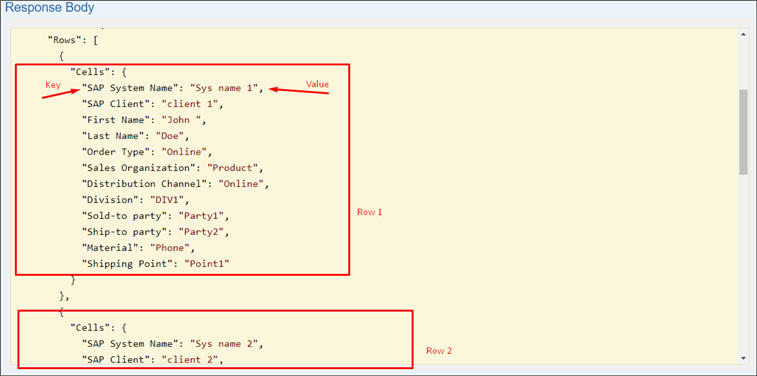
Inspect the Response body:
Component
Description
Manifest
Contains the database information.
Results
Contains the following:
-
Rows - Contains a collection of Cells, and the Cells are a collection of string values. Each string value represents a column value.
-
ID - Unique identifier for the recordset in the database
-
Name - Recordset name
-
LayoutName - Layout name
-
ColumnHeaders - String value collection of recordset columns
-
-
Copy the Response body value and save it in a .JSON file.
This file will create a payload for the Create and Append endpoints.
-
Enter the required inputs to the DELETE /api/v1/recordset/Delete/{recordsetName} end point as described in the API Endpoints section.
Example:
recordsetName: Scenario1
projectName: Function Tests
layoutFolderPath: /Functional Tests/1-RegressionTests/1-1 Integration Tests
layoutName: SAP OTC
-
Click the Try it out! button.
-
Copy the URL that was generated in the Request URL section. The URL is used to delete the Scenario1 recordset. It can be used in a Microsoft® PowerShell® script or Linux® script.
Example:
http://certifydemo/CertifyResultsAPI/api/v1/recordset/Delete/Scenario1?projectName=Functional%20Tests&layoutFolderPath=%2FFunctional%20Tests%2F1-%20Regression%20Tests%2F1-1%20Integration%20Tests&layoutName=SAP%20OTC
-
Enter the required inputs to the POST /api/v1/recordset/Create endpoint as described in the API Endpoints section.
-
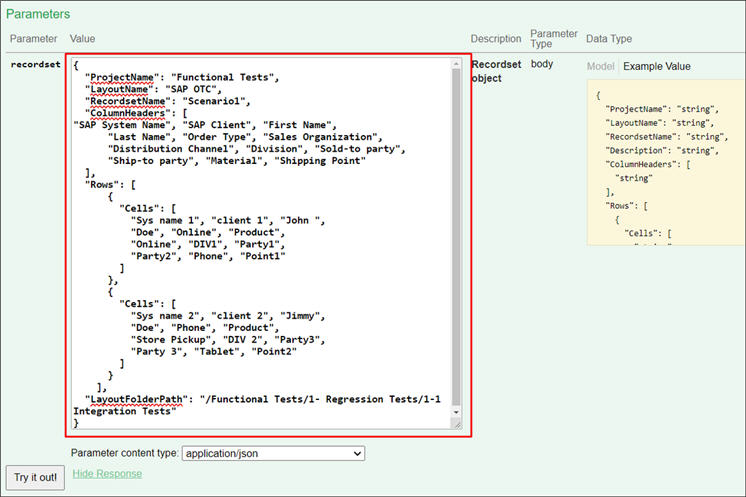
Click on the example text in the Data Type column to populate the recordset parameter value.


-
Edit the recordset value as shown below.

-
Copy the values for ColumnHeaders and Rows from the response obtained in Step 10.
Example of how the parameters (payload) should appear.
-
Click the Try it out! button.
The Scenario1 recordset is created with the data.
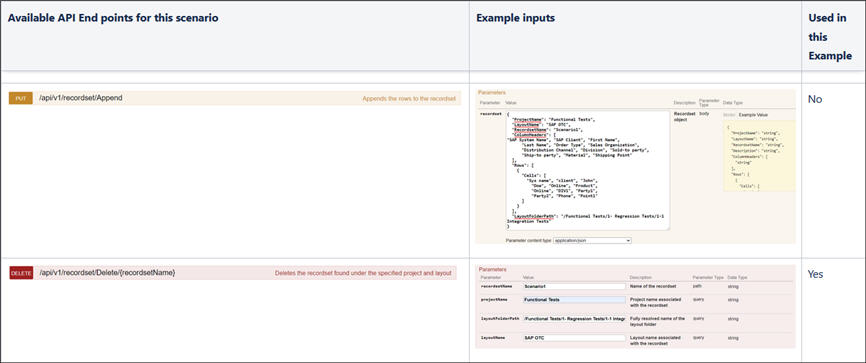
The payload for PUT /api/v1/recordset/Append is the same as Create. The only difference is that Append assumes that the recordset exists and adds recordset data over the existing collection.
The parameters for GET /api/v1/recordset/GetInAdvancedFormat/{recordsetName} is the same as GET /api/v1/recordset/Get/{recordsetName}. The difference is the response format. The recordset data is represented in key value pairs. The key value is the recordset column name and cell data, and they can be used with reporting tools.