Creating and Editing a Recordset
In Certify, recordsets contain data values used in data-driven testing. Using recordsets during process execution allows you to input or verify different data using the same process. As the certification process moves through the critical business processes, the data values change to reflect the varying state of the underlying application data.
You need a layout to create a recordset. For information on layouts, see Creating Layouts Using Processes and Child Processes and Creating Layouts Using Objects.
To create or edit a recordset:
- In the Navigation pane, click Data.
The Data window opens.
- In the Layouts Summary pane, select a layout.
- In the Details pane, click the Recordsets tab.
- If you are creating a new recordset, right-click in the tab and select New Recordset.
If you are editing a recordset, right-click on a recordset and select Edit.
The Recordset Editor opens.
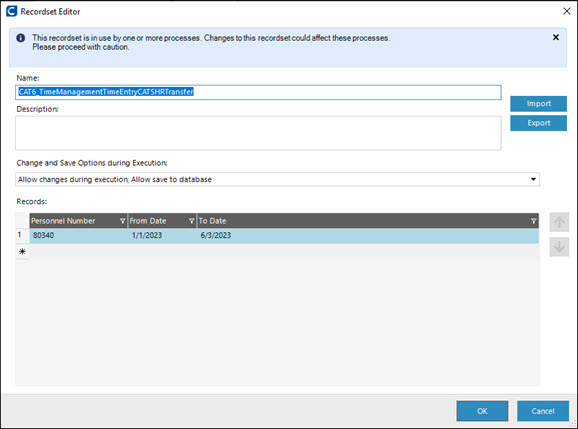
-
In the Name field, enter or edit a recordset name.
Recordset names can have a maximum of 100 characters. Special characters and numbers can be used in recordset names.
-
In the Description field, enter or edit a description to identify the recordset.
Recordset descriptions can have a maximum of 1024 characters. Special characters and numbers can be used in recordset names.
-
From the Change and Save Options During Execution drop-down list, select one of the following:
Option
Description
Allow changes during execution, Allow save to database
The recordset can be changed during execution, and if applicable, those changes are saved to the database.
No changes during execution, No save to database
In this mode, no changes are allowed to the recordset or saved to the database, regardless of the actions taken during the process.
Allow changes during execution, No save to database
Changes to the recordset are allowed, but they are not saved to the database. If the recordset is locked and opened by other users, processes that change it can still be executed. However, the changes are not saved and discarded at the end of execution. Effectively, this option causes the recordset to be edited in memory only, and any changes are discarded at the end of execution.
- In the Records field, click next to the asterisk (*).
-
Enter values you want your process to place in your application to test.
You also can import data values by clicking the Import button. For more information, see Importing Data Values and Adding Them to a Recordset.
Note: If you enter a skip character in the initial value, then it will indicate that no value is used for the step, and the step is marked as skipped during execution.
- If you are editing
values, use the Records right-click menu to copy, paste, or delete values.
Use the Arrow

 buttons to rearrange the
order of your values.
buttons to rearrange the
order of your values. - Click OK.
The data is validated and saved.
If a user enters incorrect data, the recordset will not save, and the editor will remain open. The wrong data is highlighted. Place your mouse over the highlighted area to see a tip on correcting your data. You must fix the data before the recordset can be saved.
Deleting Recordsets
When you delete a recordset, you remove the data associated with an existing layout. You cannot delete a recordset used by any process in the opened project. To determine if a recordset is in use, right-click on it and select Process Usage. For more information, see Viewing Process Usage.
To delete a recordset:
-
In the Navigation pane, click Data.
The Data window opens.
- In the Layouts Summary pane, select a layout.
- In the Details pane, click the Recordsets tab.
-
Right-click on the recordset that you want to remove and select Delete.
The Confirm Delete dialog opens.
-
Click OK.
The recordset is deleted.