Configuring Microsoft 365 to Enable OAuth for the Email Interface
To enable the Worksoft Certify Email interface to authenticate with Microsoft 365 through OAuth 2.0, your Azure administrator must represent the interface in your organization's Azure environment.
First, the administrator must register the Azure Active Directory (Azure AD) application in your Azure AD tenant. Then, the administrator must give Worksoft Certify access to authenticate and access specific mailboxes.
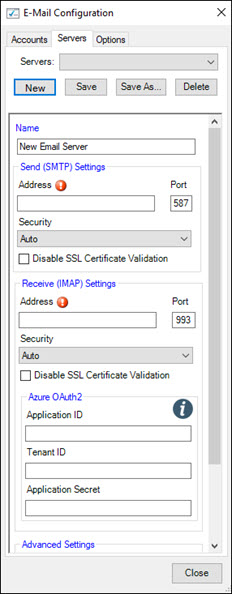
After Azure AD is configured, you will need the following information for each email account you intend to use in Certify:
- Azure application ID
- Azure tenant ID
- Azure AD secret key
Certify administrators use this information when adding email providers in the Email Configuration tool. For more information, see Managing Email Providers for the Email Interface.
Registering the Azure AD Application
For instructions on how to register an Azure AD application, click here.
Configuration Notes
- When registering, do not select the Redirect URI option because it is not used.
- In the Configure Platforms section, select Mobile and desktop applications.
Creating an Azure AD Secret
After the Azure AD application is registered, your Azure administrator generates a secret that is used in Certify to authenticate Microsoft 365 instead of a user's password. For instructions on how to create an Azure AD secret, click here.
Configuration Notes
- You can generate more than one secret, but only one is needed and can be used for numerous email accounts.
- Microsoft recommends 12 months or less expiration date.
- In the Configure Platforms section, select Mobile and desktop applications.
- Do not select the Redirect URI option because it is not used.
- Record the secret to use with the Email interface because the secret value never displays again after you leave the page.
Adding Permissions
After the application has been registered, you need to add the appropriate permissions to access email using the IMAP protocol. For instructions on how to add permissions, click here.
Configuration Notes
- Add permissions through the API Permission menu.
- Add the IMAP.AccessAsApp permission.
Granting Tenant Consent
The last step is to grant consent to the tenant to use the application permission previously added. For instructions on how to grant permissions, click here.
After the tenant administrator grants consent to the Azure AD application, the tenant must be given access to the specific mailboxes you intend to use with Certify. You will use PowerShell scripts to grant access to mailboxes. For more information, click here.
Administrators must register the Azure AD application service principal in Exchange through the Exchange Online PowerShell to access mailboxes. A service principal represents an application in your tenant or directory. Service principals only need to be registered once.
Configuration Notes
-
With the Exchange Online PowerShell, register the service principal by executing the following commands to install the ExchangeOnlineManagement module and connect to your tenant.
Install-Module -Name ExchangeOnlineManagement -allowprerelease
Import-module ExchangeOnlineManagement
Connect-ExchangeOnline -Organization <tenantId>
-
Register the service principal to the tenant.
New-ServicePrincipal -AppId <ApplicationID> -ServiceId <ObjectID> -Organization <TenantID>
Use the Object ID from the Overview page of the Azure Portal Enterprise Application node. Do not use the Object ID from the Overview of the App Registrations node because it will cause an authentication failure.
Adding Permission to Access Mailboxes
After the service principal is registered, then you can grant access to specific mailboxes. Use the service principal's UserID that you can find in Azure or by the following PowerShell command Get-ServicePrincipal | fl.
Configuration Notes
-
Run the following command to add permission to a mailbox:
Add-MailboxPermission -Identity "john.smith@contoso.com" -User <ServicePrincipalID> -AccessRights FullAccess
-
Repeat this process if you plan on using multiple email addresses with Certify.