Configuring Certify Web Interface Options
The Certify Web Interface Options tool allows you to configure the Learn configurations and eXtensibility Framework (XF) class definitions. All settings are stored in the Worksoft Certify database.
The default definitions and configurations are used in:
- Process execution
- Certify LiveTouch
XF Definitions Files and Configuration Files
Before definition or configuration files can be used, they must first be imported into Certify with the Certify Web Interface Options tool.
Configuration options are a set of rules that specify how the Learn utility will learn the application page, as well as the following items:
- Which object types to import
- How to name the objects
- Which Certify class to map elements
- What attributes to use to recognize the object
For more information, see Importing XF Definitions and Configurations Files.
Within the Global Settings tab in the Certify Web Interface Options tool, you are able to do the following tasks with both XF Definitions files and Configuration files by clicking on the appropriate buttons:
- Import an XML file
- Export an XML file
- Create a new file
- Create a new file with the Save As function
- Delete a file
- Rename a file
- Set a file as default
When you select a file in the drop-down list, the size of the XML file appears on the right side.
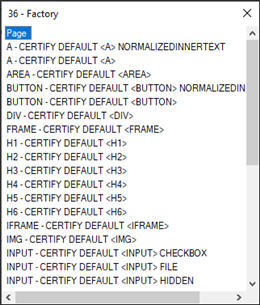
Click the file size link to display the names of the configuration rules contained in the selected configuration file or the names of class definitions in the selected definitions file.
Configuring Settings
With the Certify Web Interface Options tool, you are able to set:
- Global settings
- User settings
- Local settings
These default settings are not used with Business Capture and Standalone Business Capture.
Configuring Global Settings
Global settings are used if there is no user default settings. You must be an administrator to update these settings.
To configure global settings:
- Log on to Certify.
-
From the Certify menu, select Configure > Web > Options.
The Certify Web Interface Options tool opens.
-
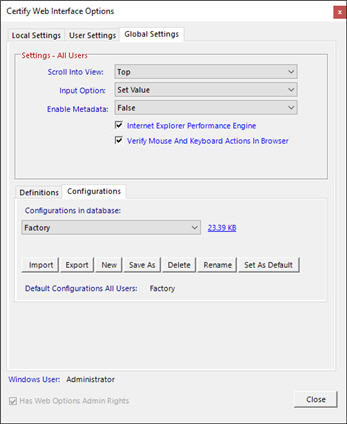
Click the Global Settings tab.
The Global Settings tab opens.
-
In the Settings - All Users section, select a value from these drop-down lists:
Drop-Down List
Values
Scroll Into View
- Top
- Middle
- Bottom
- Off
Input Option
- Set Value
- Send Keys
Enable Metadata
- True
- False
- If you want to use the Internet Explorer performance engine, select the Internet Explorer Performance Engine option.
- If you want to verify mouse and keyboard actions, select the Verify Mouse and Keyboard Actions in Browser option.
-
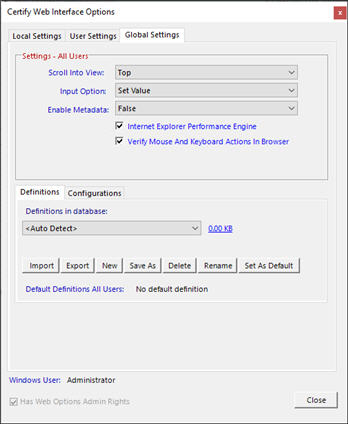
In the Definitions tab, select the XF definitions from the Definitions in database drop-down list.
XF definitions are a set of definitions that explains how the Cross Browser engine will identify and locate UI controls, such as tables and combo boxes. Definitions also play a role in creating a logical name or label attribute during the learning process.
If you were given an XF definitions from Worksoft Support team, select them from the Definitions drop-down list.
If you want Certify to find your XF Configuration file, select the Auto Detect option
- Click the Configurations tab.
-
From the Configurations in database drop-down list, select a configuration file.
Configuration files that you created with the Configuration Manager or imported into Certify are listed as options. The Factory option is the default configuration setting.
If you created a configuration file that was saved to your database, you do not need to import it. This file appears in the Configurations drop-down list.
For more information about the Configuration Manager, see Creating a New Learn Configuration with the Configuration Manager.
- Click Close to save your settings.
Configuring User Settings
In the User Settings tab, you can to configure your own Web interface options.
To configure user settings:
- Log on to Certify.
-
From the Certify menu, select Configure > Web > Options.
The Certify Web Interface Options tool opens.
-
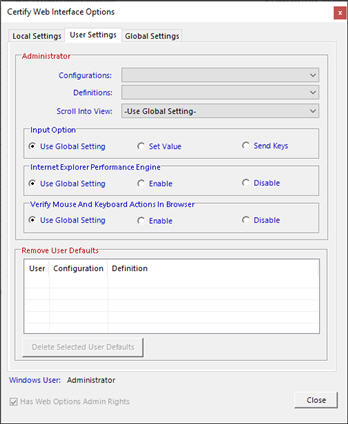
Click the User Settings tab.
The User Settings tab opens.
-
From the Configurations drop-down list, select a configuration option if you do not want to use the one specified in the Global Settings tab.
-
If you would like to use different XF definitions from the one specified in the Global Settings tab, select a different set of XF definitions from the Definitions drop-down list. To appear in the drop-down list, XF definitions need to have been imported from the Global Settings tab.
-
From the Scroll Into View drop-down list, select one of the following views:
- Use Global Settings
- Top
- Middle
- Bottom
- Off
- Select one of the following Input Options:
- Use Global Settings
- Set Value
- Send Keys
- Select one of the following Internet Explorer Performance Engine:
- Use Global Settings
- Enable
- Disable
- Select one of the following Verify Mouse and Keyboard Actions in Browser:
- Use Global Settings
- Enable
- Disable
- Click Close to save your settings.
To remove default settings:
If you want to remove your default settings, open the Certify Web Interface Options tool and click Delete Selected User Defaults in the User Settings tab.
Configuring Local Settings
The local settings options only impact the current Windows on the machine that is enabled. Through the Local Settings tab, you will choose the following settings:
- Whether to enable the Internet Explorer performance engine to replace the legacy Internet Explorer COM engine.
- Whether to enable that all mouse clicks and keyboard keystrokes are verified using events in the browser.
To configure local settings:
- Log on to Certify.
-
From the Certify menu, select Configure > Web > Options.
The Certify Web Interface Options tool opens.
-
Click the Local Settings tab.
The Local Settings tab opens.
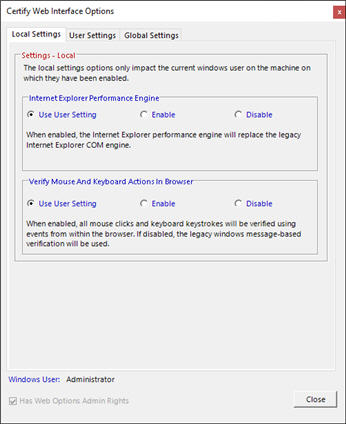
- In the Internet Explorer Performance Engine section, select one of the following options:
- Use User Setting
- Enable
- Disable
- In the Verify Mouse and Keyboard Actions in Browser section, select one of the following options:
- Use User Setting
- Enable
- Disable
- Click Close.