Adding an External Provider
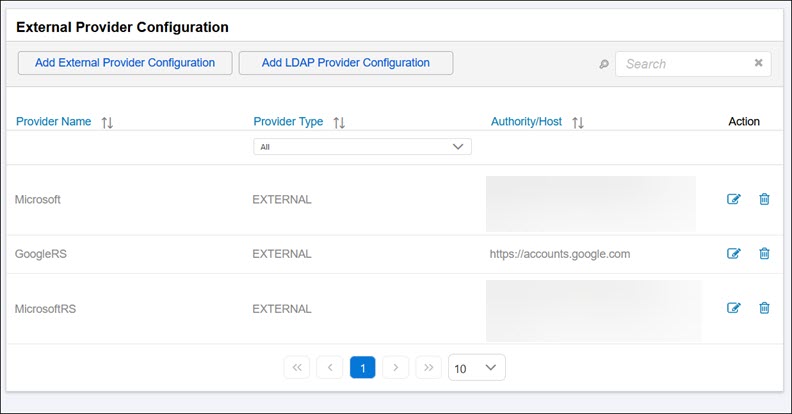
Worksoft Portal administrators and superusers can add and manage external providers in the External Provider Configuration page.
These external providers can be used for single sign-on (SSO) authorization. To enable SSO authorization, administrators must complete the following tasks:
- Add an OpenID external provider to the Worksoft Portal.
- When configuring a user, select the external provider as the Authentication Provider. For more information, see Adding Users in the Worksoft Portal.
To add an external provider:
-
Sign in to the Worksoft Portal as an administrator or superuser.
-
From the Worksoft Portal menu, select Portal Configuration > External Provider Configuration.
The External Provider Configuration page opens.
-
Click Add External Provider Configuration.
The Add External Provider Configuration page opens.
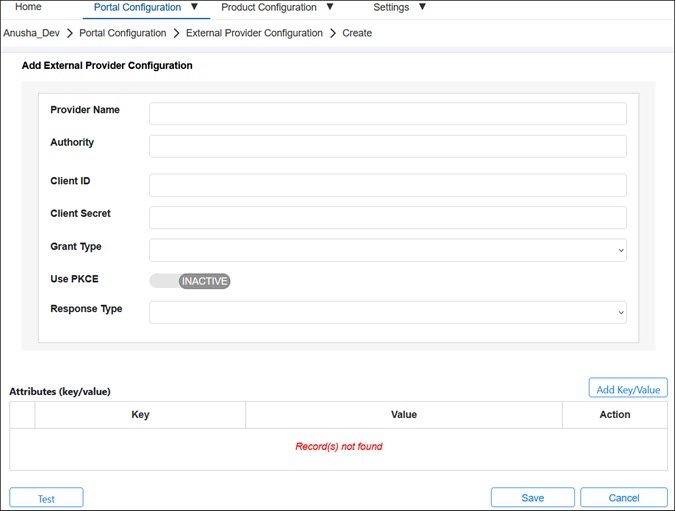
- Enter the following external OpenID provider information in the respective fields:
-
Provider name
- Authority URL
- Client ID
- Client secret
- Grant type
- If using Proof Key for Code Exchange (PKCE), select one of the following Use PKCE options:
- ACTIVE
- INACTIVE
- From the Response Type drop-down list, select one of the following response types:
- code
- id_token
- none
- token
-
Click Test.
A message opens stating if the connection works.
-
Click Save.
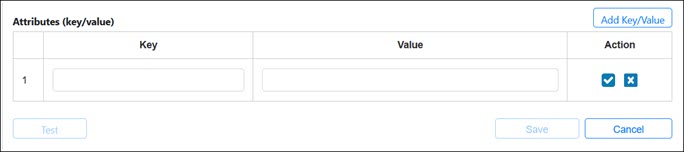
If your test configuration does not work, you may need to add key values to help identify the external provider.
To add key values:
The key values are added in request headers when sending a request to an external provider.
- Scroll down the External Provider Configuration page to view the Attributes section.
-
In the Attributes section, click the Add Key/Value button.
A row with editable fields appears.
-
In the Key field, enter a unique key.
-
In the Value field, enter a value.
-
Click the Save
 button.
The attribute is saved and appears in the grid.
-
To test the connection, click Test.
A message appears stating if the connection works.
- Click Save.
Using PingAM as an OpenID External Provider
If you are using PingAM (formerly ForgeRock Access Management) as an OpenID external provider, you must add a configuration section to the Worksoft Portal appsettings.json file. Worksoft Portal checks the values configured in the OIDCDiscoveryDocSkipConfig section in the JSON file.
"OIDCDiscoveryDocSkipConfig": [
{
"AuthorityUrl": "https://accounts.company.com",
"UserInfoUrl": "https://openidconnect.company.com/v1/userinfo",
"TokenUrl": "https://oauth2.company.com/token"
}
]
If the OIDCDiscoveryDocSkipConfig section contains values, the application compares the value in the Authority URL configured on the External Provider Configuration page with the one specified in appsettings.json. If the values match, the OpenID configuration test is successful. If the values do not match, you will get an error when testing the connection.