Creating an RPA Model
The RPA Creator generates the robotic process in Worksoft Certify based on the Capture file and RPA assets that the Discovery user provided in Worksoft RPA Orchestrator. After the Certify process is tested, the RPA Creator exports it to the RPA Orchestrator, where it is encrypted and saved to the Certify database as an RPA Model.
The following tasks must be completed:
- Review the Capture file and documents.
- Create or verify that a Certify project has the RPA Project option enabled.
- Import into Certify the Capture file from RPA Orchestrator.
- Generate and test the Certify process.
- Export the Certify process into RPA Orchestrator.
To review the Capture file and documents:
-
From the Worksoft RPA Orchestrator menu, select Project List.
The RPA Project List page opens.

-
Click the Edit
 button next to the project waiting for your action.
The Create RPA Model page opens.

- Click the Download
 button next to the Capture name and review the file.
 - Review any provided RPA assets.
-
If you determine that more information is needed from the user, click Send back to Discovery and enter instructions for missing information.
If you have enough information, you are ready to sign in to Worksoft Certify to create an RPA Model.
- Click the Note
 button for an overview of the steps you must complete.
To create or verify an RPA project in Worksoft Certify:
- Sign in to Worksoft Certify.
-
In the Navigation pane, click Projects.
The Projects window opens.
-
Create an RPA project if one does not exist. For more information, see Creating Projects.
After the project is created, you are ready to create a Certify process from the Capture file.
To import a Capture file into Certify:
- Open the RPA project in Certify.
-
In the Navigation pane, click Processes.
The Processes window opens.
-
Right-click in the Processes Summary pane and select RPA > Import Capture Files From RPA Orchestrator.
The Connect with RPA Orchestrator page opens.

-
In the Worksoft Portal URL field, enter the URL address for the Portal.
https://<portalservername>/Portal
Example: https://servername.worksoft.com/Portal
-
In the respective fields, enter your RPA Orchestrator user name and password.
-
Click Log in.
The Connect with RPA Orchestrator page opens.

- From the Select Tenant drop-down list, select your tenant.
-
Click Next.
The Select Capture File page opens.
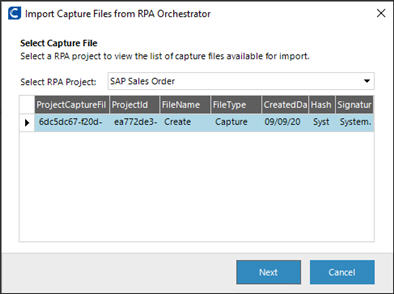
- From the Select RPA Project drop-down list, select the project that contains the Capture you want to import.
- In the Captures list, select the Capture you want to import.
-
Click Next.
The Select Application Version page opens.
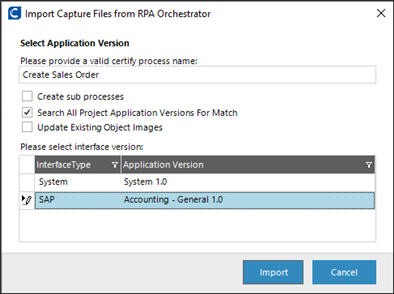
- In the Valid Certify Process Name field, enter a process name.
- If needed, select one of more of the following options:
- Create sub-processes.
- Search all project application versions for match.
- Update existing object images.
- In the Interface Versions list, select an interface version.
-
Click Import.
A message opens and states that the Capture was successfully imported.
-
Click OK.
The new process appears in the Processes Summary pane.
-
Edit and test the process.
After you have successfully edited and tested the process, you are ready to export the process to RPA Orchestrator.
To export a Certify process to the Worksoft RPA Orchestrator:
-
In the Certify Navigation pane, click the Processes button.
The Processes window opens.
-
Right-click on a process in the Processes Summary pane and select RPA > Export RPA Model to RPA Orchestrator.
The Export RPA Model to RPA Orchestrator page opens.

-
In the Worksoft Portal URL field, enter the URL address for the Portal.
https://<portalservername>/Portal
Example: https://servername.worksoft.com/Portal
-
In the respective fields, enter your Worksoft RPA Orchestrator user name and password.
-
Click Log in.
The Export RPA Model to RPA Orchestrator dialog opens.

- From the Tenant Name drop-down list, select the tenant that contains the project where you want to save the Capture.
- From the Project Name drop-down list, select the project in which you want to save the process.
- In the RPA Model Name field, the name of the selected process appears. If needed, edit the Model name.
-
Click Export.
A message opens stating that the export was successful.
- Click OK.
-
Open the Create RPA Model page in Worksoft RPA Orchestrator.
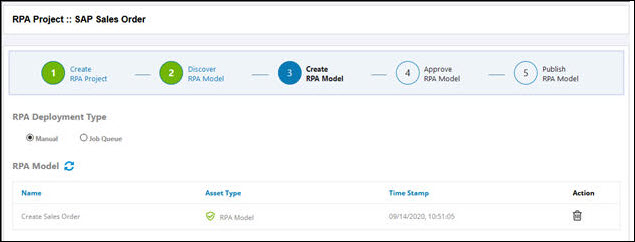
In the RPA Model section, the process you exported appears. You may need to refresh the page.
-
Click Request Approval.
The Confirmation dialog opens.
- (Optional) In the Note field, enter a note.
-
Click OK.
The Status column updates to the next step, and RPA Approver is alerted that action is required. For more information, see Approving an RPA Model.
