Editing an Object in Certify Web Learn
With the Edit Object Web tool, you can edit an object in the Learned Objects tree in Certify Web Learn.
Open Certify Web Learn from Certify by selecting Tools > Certify Interface Learn > Web from the menu.
After you have learned an application, right-click on an object and select Edit Object in the Learned Objects tree. The Edit Object Web tool opens
Toolbar Buttons
The Edit Object Web toolbar provides the following functionality:
|
Button |
Description |
|
|
Touch Live Object To use this tool, the application must be open. This button utilizes Touch Live functionality, and you can select and edit an object in the application. |
|
|
Toggle Anchor You can add and remove an anchor with this button. Anchors are object attribute strings embedded in the window attribute string. The object described by an object attribute string must be found for the window to be seen. Adding anchors to an object helps execution stay in sync with the web page because execution will continue to look for the web page until the page anchor object has finished loading. If an object already has an anchor, an Anchor tab appears in the Edit Object utility. |
|
|
Add Attributes You can add attributes to an object with this button. This button is only enabled if the window, object, or anchor is connected to a live object. |
|
|
Highlight Live Object Click this button to highlight an object in the application. This button is only enabled if the window, object, or anchor is connected to a live object. |
|
|
Rebuild Attributes From Live Object Click this button to clear the current list of attributes and replace them with attributes based on the configuration rule for the selected object. When you click the button, a message appears asking if you want to rebuild the object attribute string based with the configuration settings. Click Yesand the attributes are rebuilt. This button is only enabled if the window, object, or anchor is connected to a live object. |
|
|
Always on Top Keep Edit Object Web tool on top of all other open applications. |


Edit Object Utility Icons
The following icons are used in the Match and Edit columns:
|
Icon |
Description |
|
|
Passed In the Match column, this icon indicates when the criteria and attribute values are correct. |
|
|
Deleted In the Match column, this icon indicates the criteria and attribute values do not match. In the Edited column, this icon indicates that an attribute row has been removed. If the Active column is disabled for both TagName and Instance attributes, the Deleted icon appears. |
|
|
Unknown In the Match column, this icon indicates that there is no live window or object attached. |
|
|
Added In the Edit column, this icon indicates that an attribute row has been added. |
|
|
Edited In the Edit column, the icon indicates that a change has been made in the Criteria and/or Active Value columns. |


Edit Object Tool Procedures
With the Edit Object tool, you can do the following procedures:
- Edit an object in the Process Editor
- Add or remove an anchor
- Add new attributes
The application containing the object must be open to complete each task.
To edit an object in Certify Web Learn:
-
In the Learned Objects tree, right-click on an object and select Edit Object.
The Edit Object Web tool opens.
-
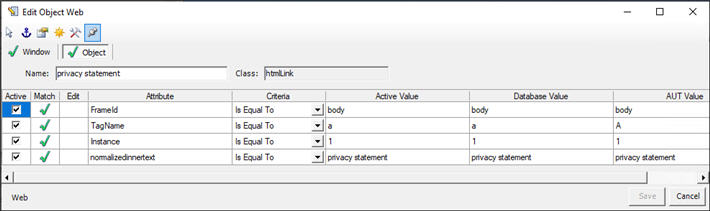
Click the Object tab.
If the object is not found, the Unknown
 icon appears in the Match column.
In the Edit Object tool, the attributes matching the selected object displays the Passed
 icon in the Match column. The attributes that do not match display the Deleted
  icon.
icon. -
To match the attribute strings with the object in the application, click the Touch Live Object
 button.
-
In the application, hover over the object and press the <Ctrl> key to select the object.
The Touched Object dialog opens, and the object is highlighted.
-
Click OK to save your object.
The AUT Value column displays the value in the application, and the Database Value column displays the value in the database.
- If needed, you can add new attributes. For more information, see To add new attributes.
- If needed, you can remove or add anchors. For more information, see To remove or add anchors.
-
After you have made your changes, click Save to save your edits.
To add or remove anchors:
If an object has an existing anchor, an Anchor tab appears in the Edit Object Web tool. If there is a bad anchor attribute string, an Unknown icon appears in the Match column. The anchor can be resolved like the object in the Object tab; however, use the Toggle Anchor button to fix the anchor attribute.
-
In the Edit Object Web tool, click the Toggle Anchor
 button to add an anchor, fix an anchor attribute string, or remove an existing anchor.
 -
If you are adding an anchor, a message opens asking if you want to add an anchor. Click Yes.
If you are removing an anchor, a message opens asking if you want to remove an anchor. Click Yes and the anchor is removed.
-
If you are adding or editing an anchor, hover over the object in the application and press the <Ctrl> key to select the object.
The Touched Object dialog opens, and the object is highlighted.
- Optional If you want to select a different object in the Touched Object dialog, select an object.
-
Click OK to save your object.
- In the Edit Object Web tool, click Save to save your edits.
To add new attributes:
- In the Edit Object Web utility, click the Object tab.
-
Click the Add Attributes
 button.
The Attributes dialog opens.
- Select an attribute or several attributes.
-
Click OK.
The new attributes appear in the Object tab in the Edit Object Web tool. In the Edit column, the Added icon appears next to the newly added attributes.
- Click Save to save your edits.