Creating a New Analysis with a Certify Workflow in Worksoft Impact
You must create a transport analysis in Worksoft Impact to identify the SAP system changes and to understand the impact by testing individual SAP transactions and executing selected Certify business processes.
You can test the usage of individual SAP transactions by executing selected Certify processes. When you create an analysis, you must complete the following tasks:
- Create a new analysis.
- Select the SAP system.
- Select the transports for your analysis.
- Select the transports and impacted objects you want to test.
- Select which Certify databases, projects, and processes you want to execute.
- View the test coverage gap.
- Create and execute a CTM suite.
- View results.
To create a new analysis:
-
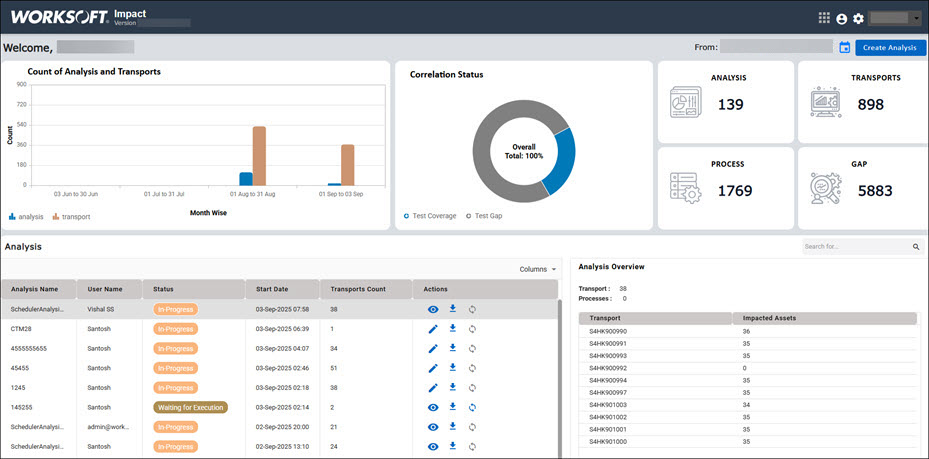
Open Worksoft Impact.
The Worksoft Impact Dashboard opens.
-
Click Create Analysis.
The New Analysis dialog opens.
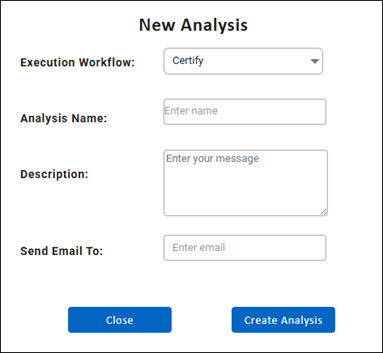
- From the Execution Workflow drop-down list, select Certify.
- In the Analysis Name field, enter a unique name to help identify the analysis.
- (Optional) In the Description field, enter a description for the analysis.
- In the Send Email To field, enter the email address where you want to receive notifications about this analysis. You can add multiple addresses by inserting a comma after each address.
-
Click Create Analysis.
The SAP System tab opens in the Analysis Configuration screen.
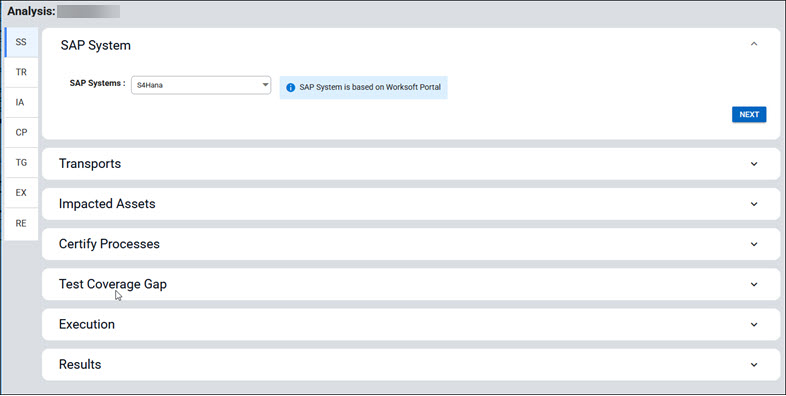
To select an SAP system:
-
From the SAP System drop-down list, select the SAP system where you want to discover transports.
The listed SAP System(s) are based on the systems you configured in the Worksoft Portal.
-
Click Next.
The Transports tab opens.
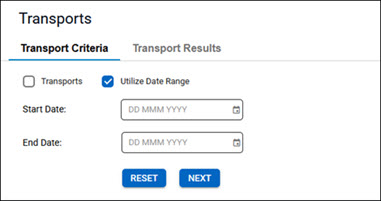
To select transports:
You must now create a search criteria to find the transports for your analysis.
- Select one of the following Transport Criteria options:
- Transports
- Utilize Date Range
-
If you selected the Utilize Date Range option to filter transports based on a specific date range, enter dates in the Start Date and End Date fields.
-
If you selected the Transports option, click the Upload button to upload transport numbers or manually enter transport number(s) in the Transport Number field. If you have multiple transport numbers, separate each number with a comma.
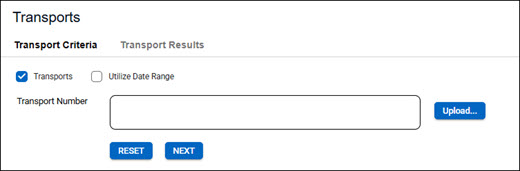
-
Click Next.
The Transport Results tab opens with the transports that met your criteria.

-
Select the transports you want to analyze.
If you have a large number of transport records, use the Search tool to find specific transports. In the Search field, enter any part of the transport number to filter transports.
Note: To view the transport details, click the Download
 button to download the transports and save them to a TransportDetails.xlsx file.
 -
Click Next.
The Impacted Assets tab opens.
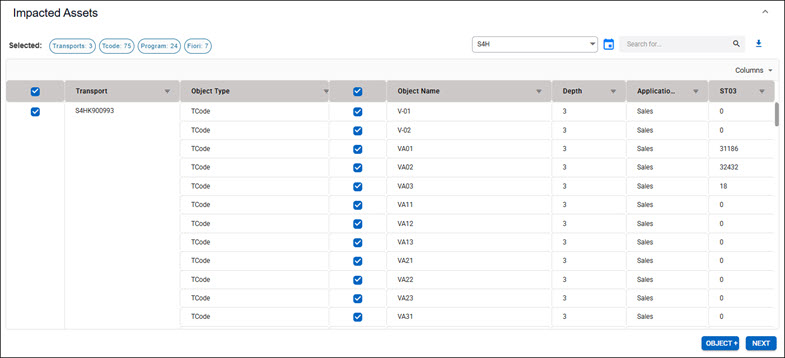
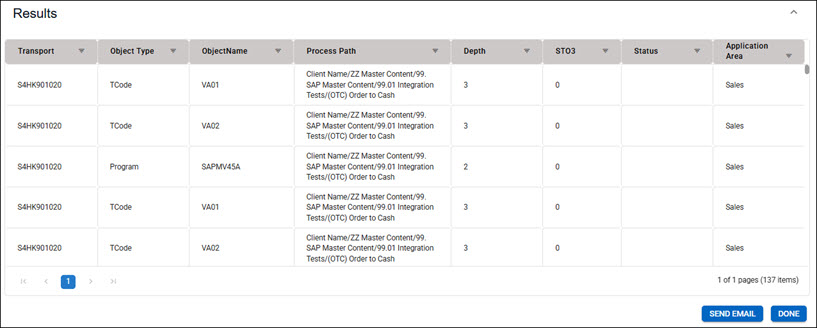
The Impacted Assets tab displays the transports, objects, and application areas impacted by these transport changes. Use the Columns drop-down list to select the columns you want to view:
Column Name
Description
Transport
Unique identifier of the SAP transport request
Object Type
Type of SAP object impacted
Examples: TCode, Program, and Fiori
Object Name
Specific object impacted
Depth
Level of dependency or impact analysis
Application Area
SAP functional area impacted
Example: Sales
ST03
The ST03 data that was uploaded in Settings.
To select the transports and objects you want to test:
-
Select the transports and impacted objects you want to test. If you want to select all transports and objects, select the Transport and Object Type column options.
If you have a large number of transport records, use the Search tool to find transports. In the Search field, enter any part of the transport number to filter transports. You can also use the Column filters to search for information.
Also, you can use the Search Date
 tool to filter transports based on a month.
 -
(Optional) If you want to add an object manually, click the OBJECT+ button.
If you do not want to add an object manually, go to Step 7.
The Add Object dialog opens.
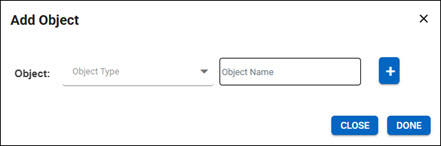
-
From the Object drop-down list, select an object type.
-
In the Object Name field, enter an object name.
-
To add more objects, click the Add Object
 button and repeat the Add Object process.
 -
Click Done.
The objects are added to your list.
-
If you want the full dataset to be promoted, click the PROMOTE ALL button to clear all applied filters.
-
Click Next.
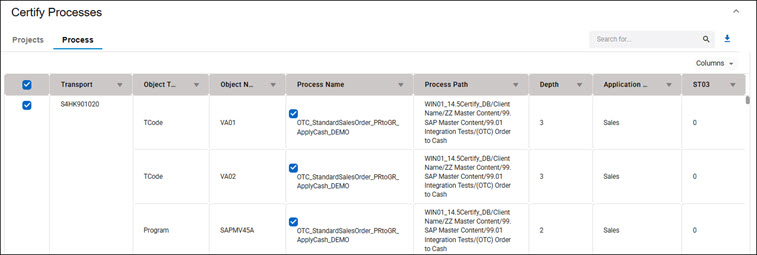
The Certify Processes tab opens.
To select the Certify databases, projects, and processes to test:
In the Certify Processes tab, you can define the scope to identify the list of correlated tests. All databases, projects, and folders must be in the selected tenant.
-
In the Projects tab, select the databases and projects you want to test.
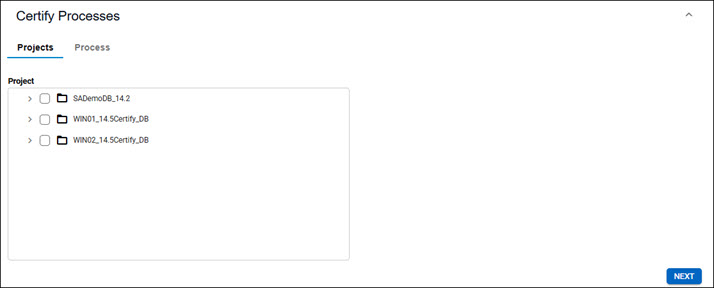
-
Click Next.
The Process tab opens.
-
Select the transports and processes you want to test.
Select the Transport column option for all transports.
-
(Optional) If you want to add a process manually, click the +PROCESSES button.
If you do not want to add a process manually, go to Step 8.
The Add Processes dialog opens.
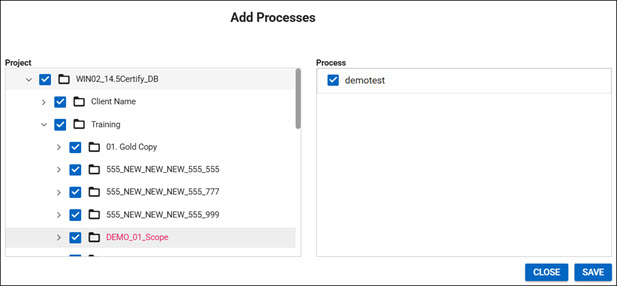
-
Select a database and project to view processes.
-
Select the processes you want to add.
-
Click Save.
Processes are added to your analysis.
-
If you want the full dataset to be promoted, click the PROMOTE ALL button to clear all applied filters.
-
Click Next.
A Performing Correlation message opens and states that the correlation is in progress.

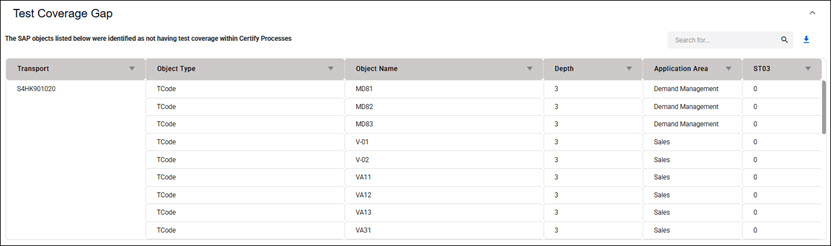
To view the test coverage gap:
Worksoft Impact goes through the database projects, folders, and processes to discover the test coverage gap.
After the correlation is complete, the Test Coverage Gap tab opens, and SAP objects that lack test coverage in Certify processes are listed.
Click Next.
The Execution tab opens.
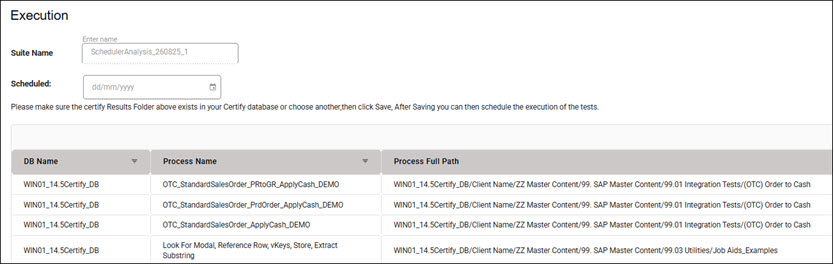
To create and execute a CTM suite:
In the Execution tab, you can create and execute a Continuous Testing Manager (CTM) suite. This grid displays the Certify processes that will be executed in the suite.
- In the Suite Name field, enter a name for your suite.
-
In the Scheduled field, click the Schedule
 button to select the date you want to schedule execution.
 -
Click Create Suite.
The Worksoft Impact dashboard opens.
To edit your analysis, click the Edit  button.
To view results:
After the execution process has been completed, the status displays Completed in the Worksoft Impact dashboard.
You can click the View ![]() button to view the results. In the Analysis Configuration screen, scroll down to the Results tab to view results.
button to view the results. In the Analysis Configuration screen, scroll down to the Results tab to view results.
The Executions tab opens and displays the execution history.
If you want to send the results to the designated email addresses, click the Send Email button stating the execution has been completed.
For more detailed results, view the results in CTM in the Executions tab. Click the Open List of Tests  button next to your suite to view the details.