Using the Image Objects Tool
With the Configure Image Object Definitions tool, you can define specific types of Silverlight and PRIMO graphical objects that can not be discovered with LiveTouch. A graphical object is an object that is defined by a collection of one or more graphical images in an application window.
This tool defines images to represent the following:
The Configure Image Object Definitions tool uses Optical Character Recognition to scrape text from images when appropriate. For example, this tool retrieves the text from a TextBox.
In order to use image objects with LiveTouch, you must select one of the following options in the Options tab within Certify Silverlight Learn:
- Use Image Objects during LiveTouch
- Use PRIMO during LiveTouch
To define Button objects:
- Open the application in which you need to learn a graphical object.
-
From the Certify menu, select Configure > Interfaces > Image Objects.
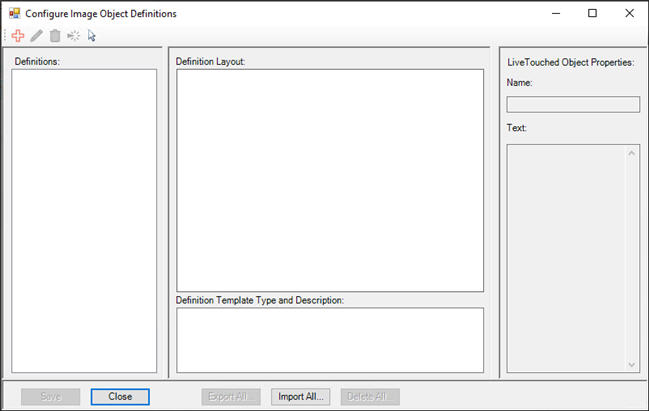
The Configure Image Object Definitions tool opens.
-
Click the New Definition
 button.
The Image Object Definition Editor opens.
- In the Definition Name field, enter a name for your definition.
- In the Definition Description field, enter a description for your definition.
-
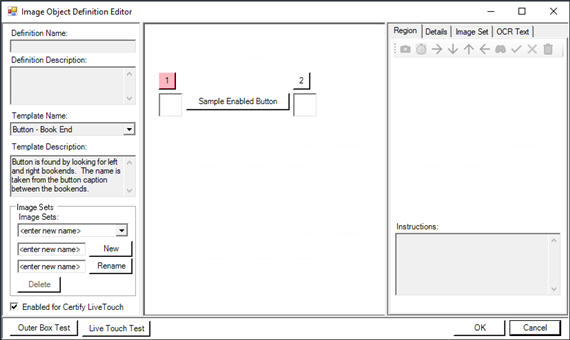
From the Template Name drop-down list, select Button - Book End.
The Template Description field describes how you will identify the button and the naming convention. You need to create two bookends to create your definition.
-
In the Image Sets field, enter a name for the image set.
-
Click New.
If you need to rename an image set, enter the new name and click Rename.
-
Verify that the Enabled for Certify LiveTouch option is selected.
-
Select the 1 option in the middle pane.
In the Instructions section of the right pane, you are instructed to select an image containing the left end of the button.
-
From the Region menu, click the Capture Image
 button.
You will now create an image that contains the left bookend. After you click the button, you are able to highlight the image.
-
Place you mouse over the application and create a rectangle image that includes the left bookend.
After you release your mouse, the image appears in the Region tab.
-
If you need to trim your image, use the Trim
 tools.
Trim your image if you captured text and other objects.
-
To test your image, click the Find Matches
 tool.
tool.The application highlights the areas that match the image.
-
If you are satisfied with the match, click the Accept Image
 button.
 If you need to redo the image, click the Discard Image
 button.
If you accepted the image, the 2 option is highlighted in the middle pane.
-
Repeat Steps 11 through 15 for the right end of the button.
- If you want to add Optical Character Recognition (OCR) text, click the OCR Text tab and enter text in the Expected text field.
-
If you want to view the details and image set, click on the respective tabs.
After you have accepted both images, you will need to test the images.
- Click the Outer Box Test button to verify that the images you created are included in the highlighted area.
-
Click the LiveTouch Test button to show the highlighted area of the button that you must select when you use LiveTouch to capture the button image.
The two images you created will not be included in the highlighted area of your application.
-
To save the definition, click OK.
The Button definition appears in the Definitions pane of the Define Image Objects tool.
-
To test the definition and simulate LiveTouch, click the Find Object with LiveTouch Point
 button.
 -
Hover over the object in the application that matches your definition, and press the <Ctrl> key.
If there is a match, the definition is highlighted in the Definitions pane, and the Definition Layout section displays the template.
-
After you have completed the test, click Save and Close.
You can now use this definition in a process using LiveTouch.
To define Image objects:
- Open the application in which you need to learn a graphical object.
-
From the Certify menu, select Configure > Interfaces > Image Objects.
The Configure Image Object Definitions tool opens.
-
Click the New Definition
button.The Image Object Definition Editor opens.
- In the Definition Name field, enter a name for your definition.
- In the Definition Description field, enter a description for your definition.
-
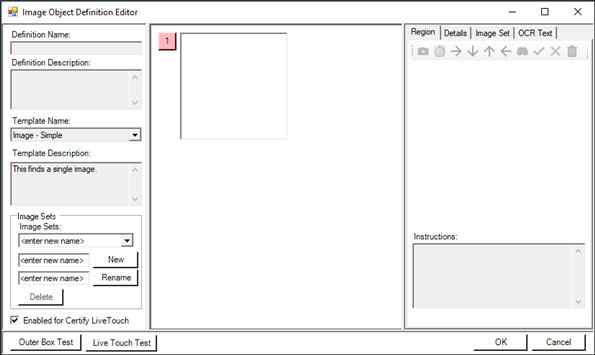
From the Template Name drop-down list, select Image - Simple.
The Template Description field describes how you will create a definition for a single image.
-
In the Image Sets field, enter a name for the image set.
-
Click New.
If you need to rename an image set, enter the new name and click Rename.
-
Verify that the Enabled for Certify LiveTouch option is selected.
-
Select the 1 option in the middle pane.
In the Instructions section of the right pane, you are instructed to select an image.
-
From the Region menu, click the Capture Image
button.You will now select an image for your definition. After you click the button, you are able to highlight the image.
-
Place your mouse over the application and select an image.
After you release your mouse, the image appears in the Region tab.
-
If you need to trim your image, use the Trim
tools.Trim your image if you captured text and other objects.
- If you want to add Optical Character Recognition (OCR) text, click the OCR Text tab and enter text in the Expected text field.
-
If you want to view the details and image set, click on the respective tabs.
-
To test your image, click the Find Matches
tool.The application highlights the areas that match the image.
-
If you are satisfied with the match, click the Accept Image
button. If you need to redo the image, click the Discard Image
button.After you have accepted the image, the middle pane displays the content of the image.
-
To test the image, click the LiveTouch Test button to show the highlighted area of the button must select when you use LiveTouch to capture the image.
The image appears in the highlighted area of your application.
-
To save the definition, click OK.
The Image definition appears in the Definitions pane of the Define Image Objects tool.
-
To test the definition and simulate LiveTouch, click the Find Object with LiveTouch Point
button. -
Hover over the object in the application that matches your definition, and press the <Ctrl> key.
If there is a match, the definition is highlighted in the Definitions pane, and the Definition Layout section displays the template.
-
After you have completed the test, click Save and Close.
You can now use this definition in a process using LiveTouch.
To define TextBox objects:
- Open the application in which you need to learn a graphical object.
-
From the Certify menu, select Configure > Interfaces > Image Objects.
The Configure Image Object Definitions tool opens.
-
Click the New Definition
button.The Image Object Definition Editor opens.
- In the Definition Name field, enter a name for your definition.
- In the Definition Description field, enter a description for your definition.
-
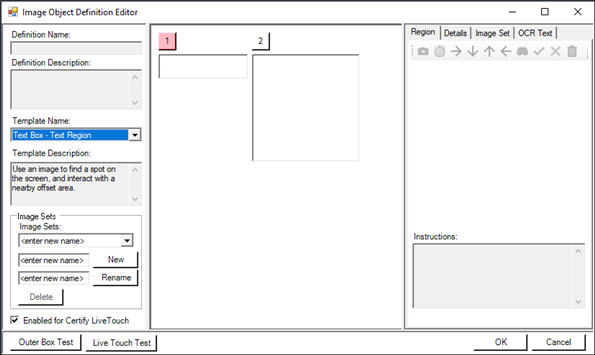
From the Template Name drop-down list, select Text Box - Text Region.
The Template Description field describes how you will be creating a definition for an image in order to find a specified location on the screen.
-
In the Image Sets field, enter a name for the image set.
-
Click New.
-
If you need to rename an image set, enter the new name and click Rename.
-
Verify that the Enabled for Certify LiveTouch option is selected.
In the middle pane, it shows that you need to create two images for this definition.
-
Select the 1 option in the middle pane.
In the Instructions section of the right pane, you are instructed to select an image that will be used to locate a position on the screen.
-
From the Region menu, click the Capture Image
button.Next, select an image for your definition. After you click the button, you can highlight the text image.
-
Place your mouse over the application and select an image. This image acts like an anchor.
After you release your mouse, the image appears in the Region tab.
-
If you need to trim your image, use the Trim
tools.Trim your image if you captured text and other objects.
-
To test your image, click the Find Matches
tool.The application highlights the areas that match the image.
-
If you are satisfied with the match, click the Accept Image
button. If you need to redo the image, click the Discard Image
button.After you have accepted the image, the middle pane displays the content of the image.
-
Select 2 in the middle pane.
In the instructions in the right pane, you are instructed to select an offset region where interactions occur. The contained image is ignored.
-
Repeat Steps 12 through 16 for the second image.
After you have accepted the image, the middle pane displays the content of the image.
- If you want to add Optical Character Recognition (OCR) text, click the OCR Text tab and enter text in the Expected text field.
-
If you want to view the details and image set, click on the respective tabs.
-
To test this image, click the Outer Box Test button to verify that the images you created are included in the highlighted area.
-
Click the LiveTouch Test button to show the highlighted area of the button you must select when you use LiveTouch to capture the image.
The image appears in the highlighted area.
-
To save the definition, click OK.
The Image definition appears in the Definitions pane of the Define Image Objects tool.
-
To test the definition and simulate LiveTouch, click the Find Object with LiveTouch Point
button. -
Hover over the object in the application that matches your definition, and press the <Ctrl> key.
If there is a match, the definition is highlighted in the Definitions pane, and the Definition Layout section displays the template.
-
After you have completed the test, click Save and Close.
You can now use this definition in a process using LiveTouch.