Connecting an Oracle Database Using an ODBC Connection
Worksoft Certify supports connecting to third-party databases using an Open Database Connectivity (ODBC) connection. This topic shows you how to connect to an Oracle® database from a Certify process and get the Oracle data using a query.
Prerequisites
Each Certify machine needs to have the following installed:
- Oracle 32-bit client
- ODBC 32-bit driver
- Accessible Oracle database server and database
-
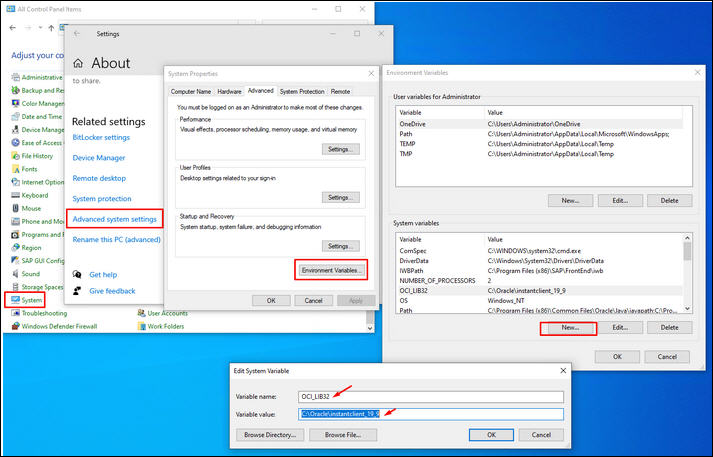
Create a Windows environment variable OCI_LIB32 and provide the Oracle client installation path as a value.
Testing the Oracle Database Connection
You can connect two ways to an Oracle database:
- Basic mode
- TNS mode
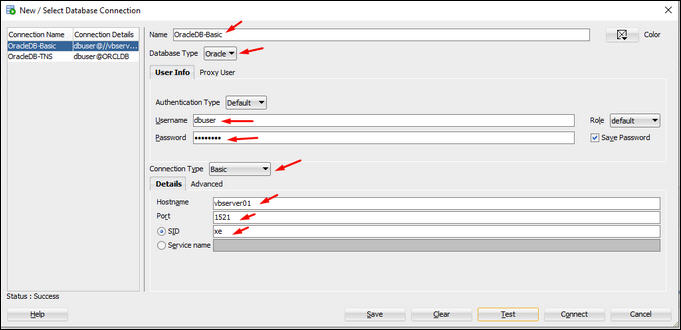
To test the Oracle database connection in Basic mode:
Provide the database connection details in the Select Database Connection dialog.
You can use a Service name or SID.
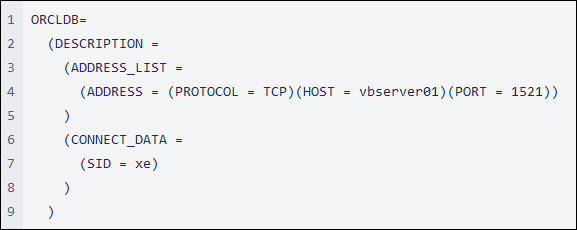
To test the Oracle database connection in TNS mode:
-
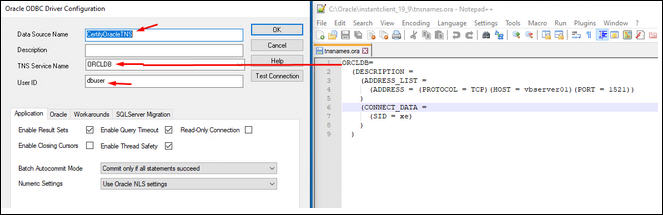
Create or edit the tnsnames.ora file under the Oracle Client installation path and add the following entry:
-
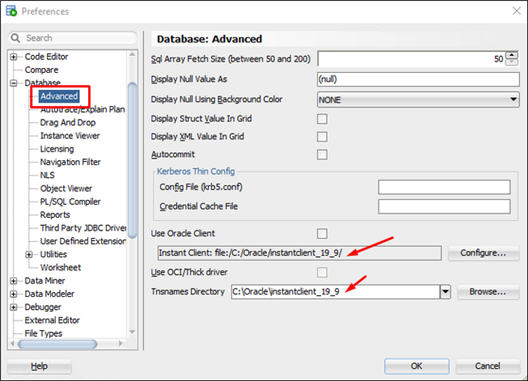
Open Oracle SQL Developer.
-
From the Oracle SQL Developer menu, select Tools > Preferences.
The Preferences dialog opens.
-
From the Navigation pane, select Database >Advanced.
- Enter your information in the following fields:
- Use Oracle Client
- Tnsnames Directory
-
In the New/Select Database Connection dialog, enter the following database connection values:
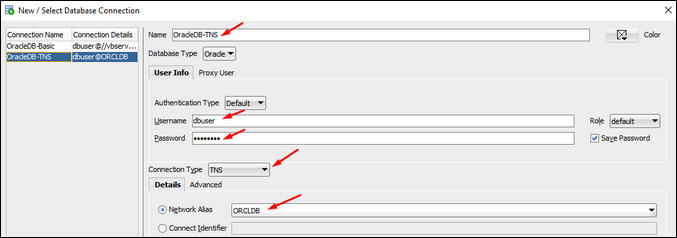
-
Test the database connection.
If the test connection fails, consult your database administrator.
Creating an ODBC Connection
This section shows how to create an ODBC connection in both the following modes:
- Basic mode
- TNS mode
To create an ODBC connection in Basic mode:
- From the Windows Control Panel, open ODBC Data Sources (32-bit).
-
Click the Add button.
The Oracle ODBC Driver Configuration dialog opens.
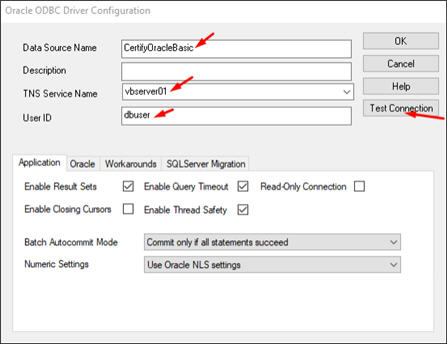
- Enter the following information:
- Data source name
- TNS service name
- User ID
-
Click the Test Connection button.
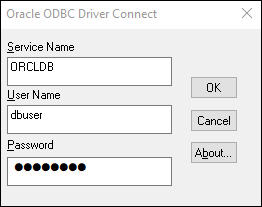
The Oracle ODBC Driver Connect dialog opens.
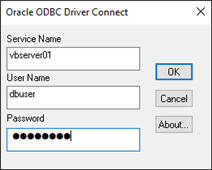
-
Enter the user name and password.
-
Click OK.
If the connection is successful, a message opens confirming the connection. Without a successful ODBC connection, Worksoft Certify cannot connect to the Oracle database.
-
Click OK.
To create an ODBC connection in TNS mode:
-
Open the Windows Control Panel and select System.
The System dialog opens.
-
Click Advanced System Settings.
The System Properties dialog opens.
-
Click Environment Variables.
The Environment Variables dialog opens.
-
Click New to create a new variable.
The Edit System Variable dialog opens.
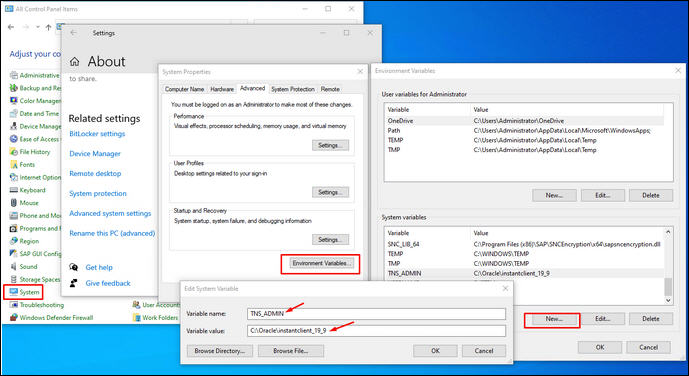
-
In the Variable name field, enter TNS_ADMIN.
-
In the Variable value field, enter the Oracle Client installation directory.
-
Click OK.
-
In the Environment Variables dialog, select Path in the System variables section.
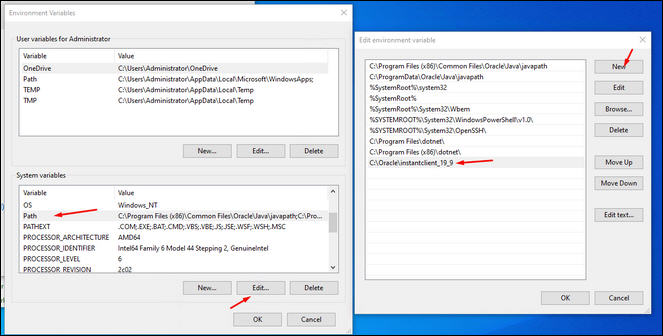
-
Click Edit.
The Edit environment variable dialog opens.
-
Click New.
-
In the Variables pane, enter the variable.
-
Click OK.
- From the Windows Control Panel, open ODBC Data Sources (32-bit).
-
Click the Add button.
The Oracle ODBC Driver Configuration dialog opens.
- Enter the following information:
- Data source name
- TNS service name
- User ID
-
Click the Test Connection button.
The Oracle ODBC Driver Connect dialog opens.
- Enter the user name and password.
-
Click OK.
If the connection is successful, a message opens confirming the connection. Without a successful ODBC connection, Worksoft Certify cannot connect to the Oracle database.
-
Click OK.
Connecting an Oracle Database to a Certify Process
To connect an Oracle database to a Certify process, you need to add ODBC System actions to your process.
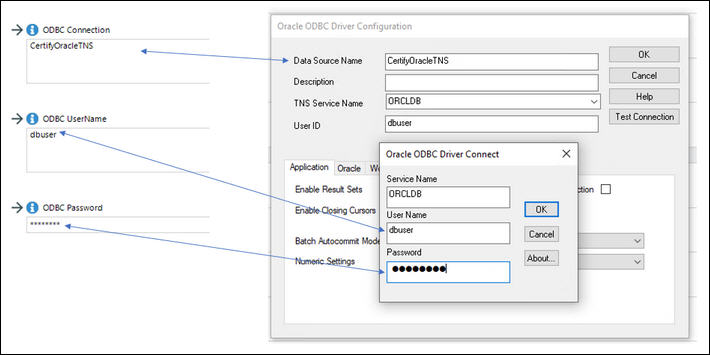
Use the Database Store or Database Verify actions. Enter values for the following parameters:
- ODBC Connection- Data source name provided in the ODBC driver configuration
- ODBC UserName - Database user name
- ODBC Password - Database password