Using Data Connect
Data Connect integrates the EPI-USE Labs Data Sync Manager (DSM) with Worksoft Certify to streamline testing, speed up delivery, and reduce risk within complex SAP systems.
Installing the Data Connect Interface
The Data Connect interface can be installed or upgraded using with the executable installer Apply.exe.
To install the Data Connect interface:
-
Run the Apply.exe file located in the following directory:
C:\Program Files (x86)\Worksoft\Certify\Interface Client\Worksoft\wsTest\DataConnect\ICLScripts
-
Open Certify.
-
From the Actions menu, select Clear API Static Data Cache to clear Certify's cache.
Certify restarts.
-
After you have signed back into Certify, select Clear Static Data Cache from the Actions menu.
Certify restarts again.
Configuring Data Connect
Before using Data Connect, a Certify administrator must configure a user profile with SAP credentials in Certify.
Only Certify administrators can add, edit, and delete profiles. Non-administrator users can only view existing profiles.
To configure a Data Connect profile follow these steps:
- Sign in to Certify.
-
From the Certify menu, select Configure > Interfaces > DataConnect.
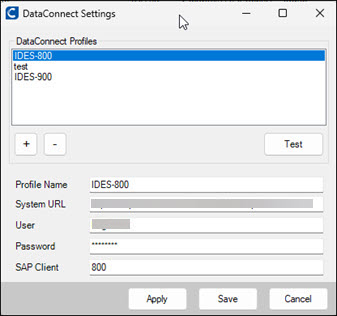
The Data Connect Settings dialog opens.
-
Click the Add New Profile
 button.
 -
In the Profile Name field, enter a unique name.
-
In the System URL field, enter the URL to the Data Sync Manager (DSM).
Example: https://<baseurl>/use/public/alm/v1
Where <baseurl> is the base URL for SICF nodes on your SAP system.
Contact your SAP administrator to get more information about the URL configured in your system.
-
In the User field, enter the SAP user you intend to use.
-
In the Password field, enter the SAP user's password.
-
In the SAP Client field, enter the SAP client.
-
Click Test to validate the information is correct.
-
Click Save to save the profile.
-
Close the DataConnect Settings tool.
Using Data Connect Interface Objects
You can use the following Certify System actions for the Data Connect interface ObjectSync objects:
|
Action |
Description |
Narrative |
|
Add Filter |
Create filters for the ObjectSync object. |
Filter <*business object> <*filter field> <*filter operation> <*value to match> |
|
Execute |
Executes an ObjectSync object. |
Perform an Object Sync operation. |
|
Monitor |
Query the status of an ObjectSync execution. |
Monitor Object Sync run <*run number> |
To create a Certify process for a Data Connect window:
-
Create a new Certify process.
For more information, see Creating Processes.
-
Add a new step and select the System 1.0 application version.
-
Select the Data Connect window.
-
If the ObjectSync object is not automatically selected, select the ObjectSync object.
-
To add a filter, select the Add Filter action.
-
Enter values into the Parameter fields:
Parameter
Description
Business Object
Enter the name of the SAP business object to filter on.
Table Name
Enter the SAP table that contains the business object.
Field
Enter the field in the table to filter on.
Operator
Enter the match type to compare the field value.
Value
Enter the field value to match against.
- Create a new step with the Data Connect window and ObjectSync object.
-
Select the Execute action.
-
Enter values into the Parameter fields:
Parameter
Description
Configuration Name
From the drop-down list, select the name of the Configuration profile saved in Certify.
The list is automatically populated with the saved profiles.
Business Object or Template ID
Enter the name of the business object or predefined template to use.
Description (Optional)
Enter a detailed explanation of what the operation does and provide the context and usage.
Insert Behavior
From the drop-down list, select how you want to control duplicate data should be handled at the destination.
Masking Policy (Optional)
If needed, enter an ID of the predefined masking policy to apply to the Object Sync.
Run
Enter the output parameter that contains the run number of the Object Sync execution.
This parameter is used by the Monitor step action to query the current status.
Transfer Route
Enter the identifier of the transfer route to use to send the data to the target system.
Transfer Type
From the drop-down list, select a transfer type.
Execution Options (Optional)
If needed, enter the number of concurrent processes to use to perform the Object Sync. Default is 1.
Advanced Options
Specify the advanced settings to use.
- Create a new step with the Data Connect window and ObjectSync object.
-
Select the Monitor action to query the status of the Object Sync execution.
-
Enter values into the Parameter fields:
Parameter
Description
Run Number
Enter the OS run number to query.
This number is typically retrieved from a Execute step action.
Wait for Completion
Select this option if you want to wait for the execution to complete.
Timeout (Optional)
If needed, enter the maximum number of minutes to wait for the execution to complete.
- If needed, add more steps to your process.
-
After you have added your steps, click the Save Process button.