Configuring Certify Databases and Licensing
After you have installed Worksoft Certify, you need to configure the following items with the Certify Configuration tool:
- Database settings
- Licensing
The Certify Configuration tool creates a file named Worksoft.Certify.exe.config.
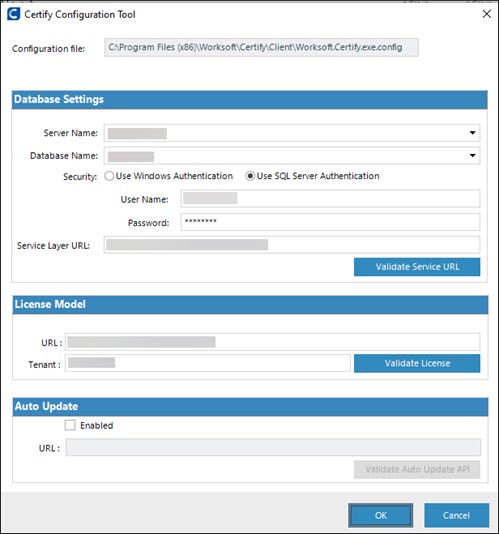
You can find this file in your C:\Program Files (x86)\Worksoft\Certify\Client directory. The configuration settings control access to the Certify system, its database, the license server, and web servers. Current settings are created at the time of installation.
To configure Certify database settings and licensing:
-
From the Certify menu, select Configure > Certify > Database and Licensing.
The Certify Configuration tool opens.
-
In the Server Name field, select a database server from the drop-down list or enter a server name.
-
In the Database Name field, enter a database name or select a database from the drop-down list.
Before you can select a database from the drop-down list, you must set up your security authentication. Go to Step 4.
-
In the Security section, select one of the following security authorizations and enter the needed information:
Security Option
Description
Use Windows Auth
Use Windows authentication.
For more information about configuring Windows authentication, see Chapter 3 in the Worksoft Certify Installation Guide.
Use SQL Server Auth
Use SQL Server authentication.
Enter the SQL Server user name and password in the respective fields.
Managed Service Identity
Use Managed Service Identity authentication.
In the User ID field, enter the ID.
-
If you selected to use Windows authorization or SQL Server authorization, you must select the Trust Server Certificate option to use an automatic certificate.
By choosing this option, the client trusts the certificate the server provides. While this option allows encrypted connections to the database server, it bypasses security between the client and server.
By default, SQL Server automatically installs a self-signed certificate that can be used by default. However, some organizations may want to install a custom certificate.
-
If you selected to use Windows authorization or SQL Server authorization, you must select the Encrypt option.
A certificate must be installed on the SQL Server to encrypt the communication channel from the Certify API to the SQL Server database.
-
In the Service Layer URL field, enter the URL address for the web server that is hosting Worksoft Certify Services.
Example: https://servername/certifyapi
- Click Validate Service URL to test your connection.
-
In the License Model section, enter the Worksoft Portal URL and tenant information.
Use Default as your tenant name unless you already have tenants created.
Example: https://servername/Portal
-
Click Validate License to test the connection.
If for some reason the test fails, troubleshoot the license server connection.
-
Click OK.
A message opens stating that you need to restart Certify to save your configuration.
- Click Yes to close Certify.
- Open Certify and sign in again.