Creating a Worksoft Portal Database
The Worksoft Portal database maintains configuration information used by Worksoft applications and services. Regardless of how many Certify databases exist, you need one Worksoft Portal database.
Before creating the Worksoft Portal database, you must generate the Authentication service database. For more information, see Creating the Authentication Service Database.
To create databases, the user must have SQL Server dbcreator permissions.
Database Connection Configuration Options
When you configure your Portal database, you can select how you want to set up your database security configuration. You need to be a superuser to configure both connections:
- User Based Configuration
- Managed Service Identity Configuration
To create a Worksoft Portal database with a user-based configuration connection:
-
Open the Worksoft Portal on your web server by navigating to the following address:
https://<portalservername>/portal
Example: https://servername.worksoft.com/portal
When you sign in to the Portal for the first time, a message opens stating that the database needs to be configured.
-
Click the link to open the Configuration page.
The Database Connection Setup page opens.

-
Select the User Based Configuration option.
- In the Database Server field, enter the server name.
- In the Database Name field, enter the database name.
-
If you want to use Windows authentication, select the Use Trusted Connection (Windows) option.
For more information about configuring Windows authentication, see Chapter 2 in the Worksoft Infrastructure Services Installation Guide.
-
If you want to use SQL Server authentication, enter the SQL Server user name and password in the respective fields.
-
Select the Trust Server Certificate option.
-
Click Test to test your database connection.
A message opens stating if the connection was successful or failed. If the test fails, troubleshoot the database connection.
- Click OK to close the message.
-
Click Save to save your database.
A message opens stating the connection was successful.
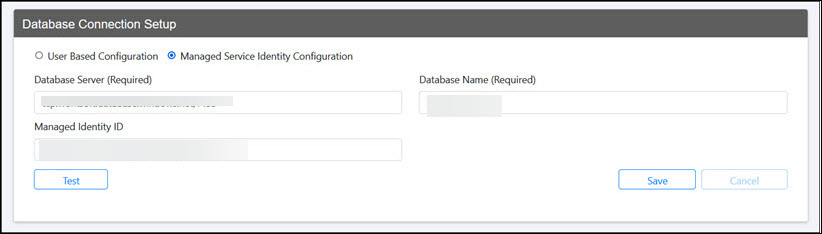
To create a Worksoft Portal database with a Managed Service Identity configuration connection:
-
Open the Worksoft Portal on your web server by navigating to the following address:
https://<portalservername>/portal
Example: https://servername.worksoft.com/portal
When you sign into the Portal for the first time, a message opens stating that the database needs to be configured.
-
Click the link to open the Configuration page.
The Database Connection Setup page opens.
-
Select the Managed Service Identity Configuration option.
- In the Database Server field, enter the server name.
- In the Database Name field, enter the database name.
- In the Managed Identity ID field, enter the ID.
-
Click Test to test your database connection.
A message opens stating if the connection was successful or failed. If the test fails, troubleshoot the database connection.
- Click OK to close the message.
-
Click Save to save your database.
A message opens stating the connection was successful.