Setting Up Automated Certify BPP Reports
Certify BPP allows for the automatic generation of reports when a Certify process execution has been completed. When a new result is discovered in the Certify folder that you specified, Certify BPP generates a report for that result. You can use the same report multiple times, point to different result folders, and point numerous reports to the same result folder.
To automate a report, you will need to select a report template and the Certify result folder.
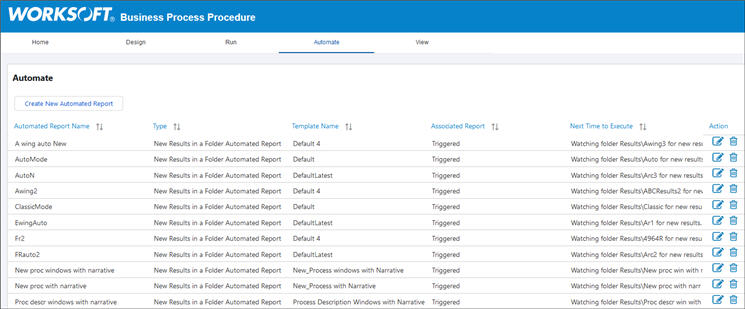
The Automate screen displays a summary of the system's current automated reports. When you click on an automated report in the left pane, the right Details pane displays a report summary.
To set up an automated report:
-
From the Certify BPP menu, click the Automate tab.
The Automate tab opens.

- Click Create New Automated Report.
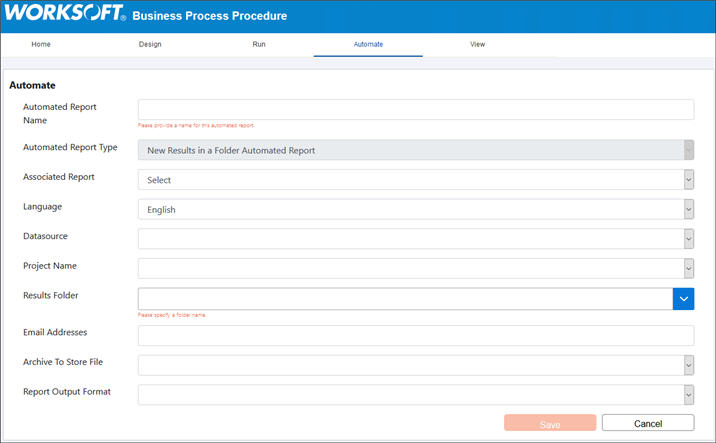
The Create Automated Report page opens.

- In the Automated Report Name field, enter a name for your report.
- From the Automated Report Type drop-down list, select default New Results in a Folder Automated Report.
- From the Associated Report drop-down list, select a report.
-
Select or add values from the drop-down lists for the following fields:
Field
Description
Language
Select the language in which you want the report to be written.
Data Source
If you have multiple data sources, select the database in which the Certify process result is stored.
Project Name
Select the Certify project that contains the process result.
Results Folder
Select the folder where the result is being saved in Certify.
Email Addresses
If you want to receive a report through email, enter an email address into this field.
If you choose to use multiple email addresses, add a semi-colon between the addresses.
Archive to Store File
This option is already selected to the default archive.
Certify BPP supports multiple archives. If multiple archives are created, select a specific archive from the drop-down list.
Report Output Format
Select the file format for the report:
- DOC
- DOCX
- XPS
- Click Save.
The Automate tab appears with the new automated report added to the list. This report stays in the ready state until a new Certify result is found for this process.
To edit an automated report:
-
In the Automate tab, click the Edit
 button next to the report template you want to edit.
The Create Automated Report page opens.
- Apply any needed edits.
- Click Save to save your updates.